Halloween is a great excuse for a project, Last year I decide to make a replacement for the candle in my pumpkin, you can find that blog post HERE. This year I thought I would build on the previous project but I only started thinking about it at the start of September which didn’t give me much time to come up. This is the first project ive had that’s had a deadline so I didn’t have much time to try anything new.
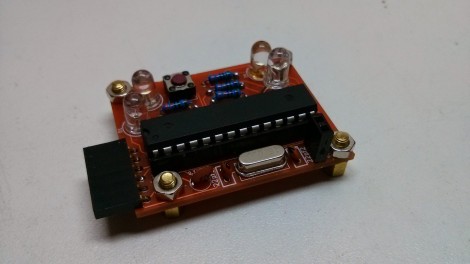
I could have went with a Attiny85 and a RGB LED but I wanted it to be easily programmable and maybe add a few more LED’s into the mix. This is why I went with a good old Atmega328 teamed with a 16mhz crystal and 2x 22uf caps made it a bare bones arduino. From there I added a RGB LED so I could have a great selection of colours I also decided to add 2 white LED’s and a fake cheap candle LED.
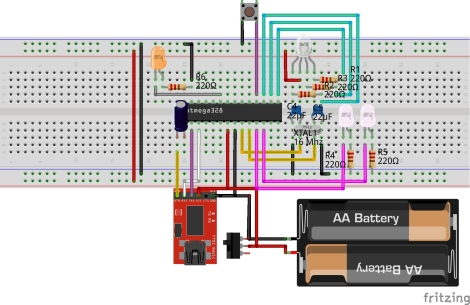
As of late ive been bread boarding my projects than when im happy I transfer the bread board design onto fritzing as a reference.
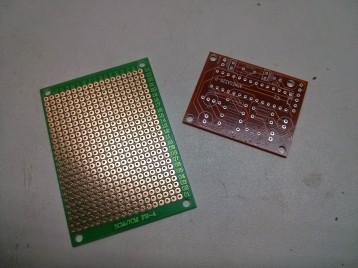
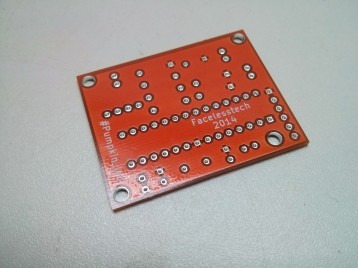
after that I make my schematics and PCB board layout using Kicad which is a great open source cross-platform PCB design tool. I normally get my PCB boards spun at oshpark but i thought i would try out ragworm which is a UK PCB board house that do orange PCB’s which seamed appropriate for a Halloween project. Ragworm are a little bit more expensive then oshpark and you only get 1 board instead of 3 but hey I thought I would support UK manufacturing, I also got this cool free perfboard in the envelope
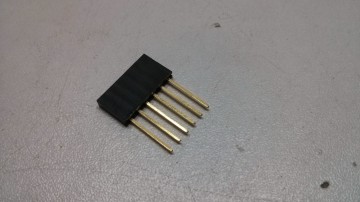
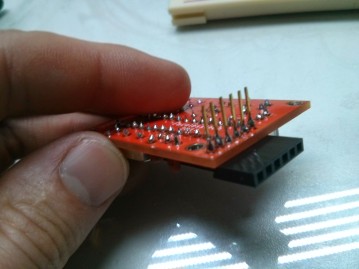
When I was searching for parts for this project I wanted some 90 degree single row female headers to use for the FTDI connections but I could only find double row female headers. I found these long legged female headers, the ones you use if you want to make a arduino shield and want to a pass though to the original headers on the board.
To bend then 90 degrees all I did was insert the legs into the PCB and bent them so they would all be bent equally, then solder then in place.
All the hardware was taken care of now to move onto the code, some of the code was recycled from last years project but with some added RGB trickery. I wanted the RGB LED to fade between colours but didn’t know where to start writing the code. after searching round on google I found this really cool blog post with just what I was looking for. I need the fade code to have no delays in it since I was wanted to cycle thought the different modes with a button press.
/* The RGB fade code was borrowed from this great website
http://www.techhelpblog.com/2013/10/22/arduino-code-smooth-fading-rgb-leds-pwm/
*/

int whiteLed1 = 5; // white led pin 5
int whiteLed2 = 6; // white led pin 6
int candleLed = 14; // Candle led pin 14

// RGB LED
String led_colour;
int RED_PIN = 11; // Red led set to pin 11
int GRN_PIN = 10; // Green led set to pin 10
int BLU_PIN = 9; // Blue led set to pin 9
#define COMMON_ANODE

// ------ Fade code start ------
byte RED, GREEN, BLUE;
byte RED_A = 0;
byte GREEN_A = 0;
byte BLUE_A = 0;
int led_delay = 0;
byte colour_count = 1; //Count the colours out
#define colour_count_max 7 //Set this to the max number of colours defined
#define colour_delay 4000 //Define the delay between changing colours in ms
#define time_at_colour 500 //Time to stay on a colour in ms

//Some Time values
unsigned long TIME_LED = 0;
unsigned long TIME_COLOUR = 0;

//Define Colours here.
//Blue
#define C1_R 0
#define C1_G 127
#define C1_B 255
//Red
#define C2_R 255
#define C2_G 0
#define C2_B 0
//White
#define C3_R 255
#define C3_G 255
#define C3_B 255
//Orange
#define C4_R 255
#define C4_G 127
#define C4_B 0
//Light Blue
#define C5_R 0
#define C5_G 255
#define C5_B 255
//Purple
#define C6_R 175
#define C6_G 0
#define C6_B 175
//Yellow
#define C7_R 255
#define C7_G 250
#define C7_B 0

// ------ Fade code end ------

// buttons code
const int button1 = 12;
int buttonPushCounter1 = 1; // counts the button pushes
int buttonState1 = 0; // tracks the button state
int lastButtonState1 = 0; // last state of the button

// debounce code
int buttonState; // the current reading from the input pin
int lastButtonState = LOW;
long lastDebounceTime = 0; // the last time the output pin was toggled
long debounceDelay = 50; // the debounce time; increase if the output flickers

int brightness = 0; // how bright the LED is
int fadeAmount = 5; // how many points to fade the LED by
long waitUntilpulse1 = 0; // Millis wait times
long waitUntilpulse2 = 20; // Millis wait times

long waitUntilpolice1 = 0; // Millis wait times
long waitUntilpolice2 = 200; // Millis wait times

long waitUntilstrobe1 = 0; // Millis wait times
long waitUntilstrobe2 = 20; // Millis wait times

void setup() {
 pinMode(whiteLed1, OUTPUT); // Set LED as output
 pinMode(whiteLed2, OUTPUT); // Set LED as output
 pinMode(candleLed, OUTPUT); // Set LED as output

 //Assign initial values
 RED = C1_R;
 GREEN = C1_G;
 BLUE = C1_B;
 //Get the led_delay speed
 led_delay = (colour_delay - time_at_colour) / 255;

 pinMode(RED_PIN, OUTPUT); // Set red led pin to output
 pinMode(GRN_PIN, OUTPUT); // Set green led pin to output
 pinMode(BLU_PIN, OUTPUT); // Set blue led pin to output

 pinMode(button1, INPUT); // Set button input
 digitalWrite(button1, HIGH); // Set internal pull up resistor

 Serial.begin(9600); // Start serial
}

void loop() {

// ------Start of button code ------
 int reading = digitalRead(button1);
 buttonState1 = digitalRead(button1);

 if (reading != lastButtonState) {
 lastDebounceTime = millis();
 }

 if ((millis() - lastDebounceTime) > debounceDelay) {

 if (reading != buttonState) {
 buttonState = reading;

 if (buttonState1 != lastButtonState1) {

 if (buttonState1 == LOW) {
 buttonPushCounter1++;
 digitalWrite(candleLed, LOW); // Turn LED off
 setColor(0, 0, 0); // off
 analogWrite(whiteLed1, LOW); // Turn LED off
 analogWrite(whiteLed2, LOW); // Turn LED off

 if (buttonPushCounter1 == 14) {
 buttonPushCounter1 = 1;}
 }
 else {
 }
 }
 lastButtonState1 = buttonState1;
 }
 }
 lastButtonState = reading;
// ------ End of button code ------

 if(buttonPushCounter1 == 1) {
 setColor(255, 255, 0); // yellow
 }

 if(buttonPushCounter1 == 2) {
 setColor(255, 127, 0); // orange
 }

 if(buttonPushCounter1 == 3) {
 setColor(255, 0, 0); // red
 }

 if(buttonPushCounter1 == 4) {
 setColor(175, 0, 175); // purple
 }

 if(buttonPushCounter1 == 5) {
 setColor(0, 255, 255); // aqua
 }

 if(buttonPushCounter1 == 6) {
 setColor(0, 127, 255); // blue
 }

 if(buttonPushCounter1 == 7) {
 setColor(0, 255, 0); // green
 }

 if(buttonPushCounter1 == 8) {
 // Police flashing mode
 if (millis() >= waitUntilpolice1) {
 setColor(255, 0, 0); // red
 waitUntilpolice1 += 400;
 }
 if (millis() >= waitUntilpolice2) {
 setColor(0, 127, 255); // blue
 waitUntilpolice2 += 400;
 }
 }

 if(buttonPushCounter1 == 9) {
 // RGB Colour fade mode
 if(millis() - TIME_LED >= led_delay){
 TIME_LED = millis();

 //Run the LED Function to check and adjust the values
 LED();
 }

 if(millis() - TIME_COLOUR >= colour_delay){
 TIME_COLOUR = millis();

 //Run the Colour Change function
 COLOUR();
 }

}

 if(buttonPushCounter1 == 10) {
 // Pulsing white LED mode
 if (millis() >= waitUntilpulse1) {
 analogWrite(whiteLed1, brightness);
 analogWrite(whiteLed2, <span class="hiddenGrammarError" pre=""><span class="hiddenGrammarError" pre=""><span class="hiddenGrammarError" pre=""><span class="hiddenGrammarError" pre=""><span class="hiddenGrammarError" pre="">brightness);
 brightness</span></span></span></span></span> = brightness + fadeAmount;
 waitUntilpulse1 += 40;
 }
 if (brightness == 0 || brightness == 255) {
 fadeAmount = -fadeAmount ;
 }
 if (millis() >= waitUntilpulse2) {
 analogWrite(whiteLed1, brightness);
 analogWrite(whiteLed2, brightness);
 brightness = brightness + fadeAmount;
 waitUntilpulse2 += 40;
 }
 if (brightness == 0 || brightness == 255) {
 fadeAmount = -fadeAmount ;
 }
 }

 if(buttonPushCounter1 == 11) {
 // Strobe mode
 if (millis() >= waitUntilstrobe1) {
 digitalWrite(whiteLed1, LOW);
 digitalWrite(whiteLed2, LOW);
 waitUntilstrobe1 += 40;
 }
 if (millis() >= waitUntilstrobe2) {
 digitalWrite(whiteLed1, HIGH);
 digitalWrite(whiteLed2, HIGH);
 waitUntilstrobe2 += 40;
 }
 }

 if(buttonPushCounter1 == 12) {
 // Candle mode
 digitalWrite(candleLed, HIGH);
 }

 if(buttonPushCounter1 == 13) {
 // Off mode
 digitalWrite(candleLed, LOW);
 setColor(0, 0, 0); // off
 analogWrite(whiteLed1, LOW);
 analogWrite(whiteLed2, LOW);
 }
}

// Set RGB colours
void setColor(int red, int green, int blue)
{
 #ifdef COMMON_ANODE
 red = 255 - red;
 green = 255 - green;
 blue = 255 - blue;
 #endif
 analogWrite(RED_PIN, red);
 analogWrite(GRN_PIN, green);
 analogWrite(BLU_PIN, blue);
}

void LED()
{
 //Check Values and adjust "Active" Value
 if(RED != RED_A){
 if(RED_A > RED) RED_A = RED_A - 1;
 if(RED_A < RED) RED_A++;
 }
 if(GREEN != GREEN_A){
 if(GREEN_A > GREEN) GREEN_A = GREEN_A - 1;
 if(GREEN_A < GREEN) GREEN_A++;
 }
 if(BLUE != BLUE_A){
 if(BLUE_A > BLUE) BLUE_A = BLUE_A - 1;
 if(BLUE_A < BLUE) BLUE_A++;
 }

 //Assign modified values to the pwm outputs for each colour led
 analogWrite(RED_PIN, RED_A);
 analogWrite(GRN_PIN, GREEN_A);
 analogWrite(BLU_PIN, BLUE_A);

}

void COLOUR()
{
 //Increment the colour by one or go back to 1 if maxed out
 if(colour_count < colour_count_max) colour_count++;
 else colour_count = 1;

 if(colour_count == 1){
 RED = C1_R;
 GREEN = C1_G;
 BLUE = C1_B;
 } else if(colour_count == 2){
 RED = C2_R;
 GREEN = C2_G;
 BLUE = C2_B;
 } else if(colour_count == 3){
 RED = C3_R;
 GREEN = C3_G;
 BLUE = C3_B;
 } else if(colour_count == 4){
 RED = C4_R;
 GREEN = C4_G;
 BLUE = C4_B;
 } else if(colour_count == 5){
 RED = C5_R;
 GREEN = C5_G;
 BLUE = C5_B;
 } else if(colour_count == 6){
 RED = C6_R;
 GREEN = C6_G;
 BLUE = C6_B;
 } else if(colour_count == 7){
 RED = C7_R;
 GREEN = C7_G;
 BLUE = C7_B;
 }
}</pre>
Here is a video of it in action
All the code can be found on my Github

Leave a comment